본 글은 Windows 에서 WSL을 이용하여 Ardupilot을 시뮬레이션하는 과정을 다룬다.
순서는 이렇다.
1.0) Ardupilot 저장소 clone 하기
1.0) Windows에서 Visual Studio Code 설치 (Optional)
1.0) Windows에서 WSL2 설치
1.0) Windows에서 GitHub Desktop 설치 (Optional)
Windows 에서 빌드 환경 설정하기 [1]
Windows 10 에서 WSL2 설치하기 [2]
WSL2 에서 빌드 환경 설정 [3]
Ubuntu 18.04으로 설치 한 후, 다음의 절차대로 WSL 터미널에 명령을 입력한다.
1) Ubuntu APT 저장소 업데이트
sudo apt-get update
sudo apt-get upgrade -y
sudo apt-get install git -y
sudo apt-get install gitk git-gui -y
2) WSL 터미널에서 Ardupilot 저장소 복사하기
git clone https://github.com/[[[PATH]]]/ardupilot
cd ardupilot
git submodule update --init --recursive
3) Ardupilot 사용에 필요한 저장소 설치하기
bash 형태로 되어있어서 필요한 저장소를 설치하고 설정을 해준다.
cd [[[PATH]]]/ardupilot
./Tools/environment_install/install-prereqs-ubuntu.sh -y
Troubleshooting : /usr/bin/env: 'bash\r' : No such file or directory [4]
OS 간의 개행 문자가 \r\n과 \n으로 달라서 생기는 문제라고 한다.
그리고.. Windows에서 clone하고 Ubuntu에서 쓰면 모든 쉘 코드에서 저 문제가 생긴다....ㅠ [5]
진짜다...
Waf를 이용한 Ardupilot 프로젝트 빌드하기 [6]
0) ArduCopter 빌드하기
Pixhawk Cube Black 을 대상으로 멀티콥터 펌웨어를 빌드하자.
아래 명령어를 WSL 터미널에 입력한다.
./waf configure --board CubeBlack
./waf copter
1) 타겟 보드 선택하기
위와 같이 Cube Black 뿐만 아니라 다음 명령어로 선택가능한 다양한 타겟 보드를 알 수 있다.
./waf list_boards특정 임베디드 보드 뿐만 아니라, 다음과 같이 SITL를 선택할 수도 있다.
./waf configure --board sitl2) 타겟 기체 선택하기
많이 사용하는 기체 타입은 다음과 같다.
./waf copter     # All multi-copter types
./waf heli
./waf plane      # Including VTOL
./waf rover      # Ground-based rovers and surface boats
./waf sub
./waf antennatracker
3) 빌드 결과물 삭제하기
clean을 입력하면 configure으로 선택한 타겟 보드에 대한 결과물만 지운다.
distclean을 입력하면 모든 빌드 결과물을 지운다.
./waf clean
./waf distclean
4) 업로드 혹은 설치하기
--upload 옵션은 연결된 보드에 이진 파일을 업로드한다는 옵션이고
--targets 옵션은 이진 파일을 선택하는 옵션이다.
./waf --target bin/arducopter --uploadLinuxOS가 탑재된 시스템은 보드의 IP를 설정해줘야한다. 그래서 하는 방법은 다음과 같다.
./waf configure --board <board> --rsync-dest <destination>

./waf configure --board navio2 --rsync-dest root@192.168.1.2:/
./waf --target bin/arducopter --upload
Ardupilot SITL 해보기
xming 으로 Xwindows를 포워딩하는 방법은 다음 글을 참고한다. https://stella47.tistory.com/134
아래 명령어를 WSL에 입력한다.
cd ardupilot
./waf configure --board sitl
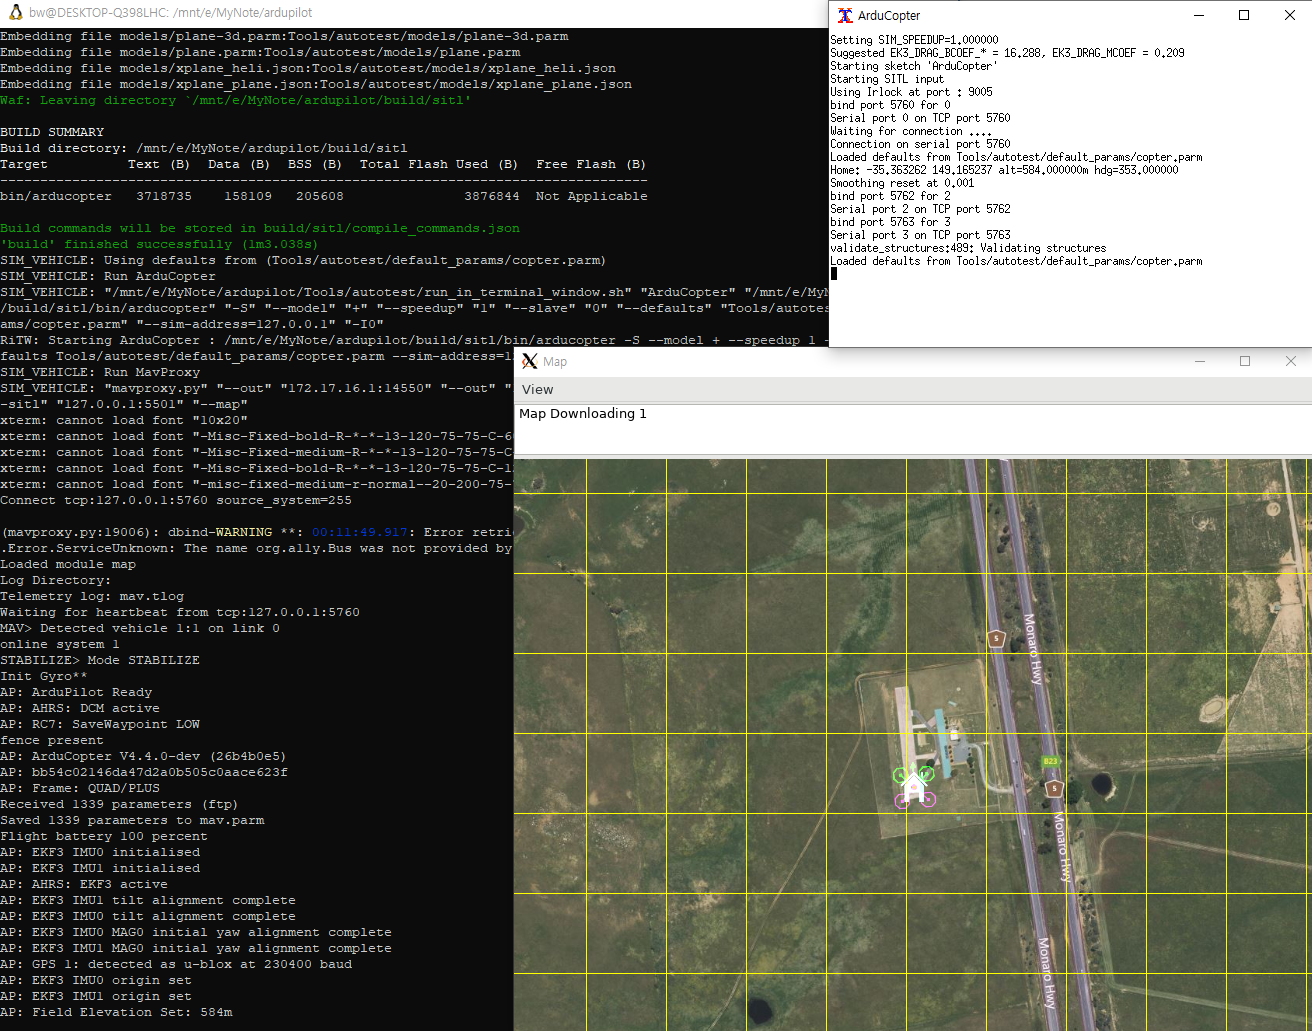
./Tools/autotest/sim_vehicle.py -v ArduCopter --map console
띄우면 다음과 같이 나온다.

Troubleshooting : Can't open display
다음 에러메시지를 출력하면서 그냥 꺼진다.
SIM_VEHICLE: Run MavProxy
SIM_VEHICLE: "mavproxy.py" "--out" "XXX.XXX.XXX.XXX:14550" "--out" "XXX.XXX.XXX.XXX:14551" "--master" "tcp:127.0.0.1:5760" "--sitl" "127.0.0.1:5501" "--map"
No protocol specified
xterm: Xt error: Can't open display: XXX.XXX.XXX.XXX:0
Connect tcp:127.0.0.1:5760 source_system=255
[Errno 111] Connection refused sleeping
[Errno 111] Connection refused sleeping
[Errno 111] Connection refused sleeping
[Errno 111] Connection refused sleeping
Failed to connect to tcp:127.0.0.1:5760 : [Errno 111] Connection refused
SIM_VEHICLE: MAVProxy exited
SIM_VEHICLE: Killing tasks
Windows 10의 xming 설정이 잘못되어있을 것이다.
[8]을 참고하여 xeyes가 뜨는 것을 확인한다.
[1] Ardupilot, Setup the Build Environment on Windows, https://ardupilot.org/dev/docs/building-setup-windows.html
[2] Ardupilot, Setting up the Bulid Environment on Windows 10/11 using WSL1 or WSL2, https://ardupilot.org/dev/docs/building-setup-windows10.html
[3] Ardupilot, Setting up the Build Envinronment (Linux/Ubuntu), https://ardupilot.org/dev/docs/building-setup-linux.html
[4] [WSL, 터미널] - /usr/bin/env: ‘bash\r’: No such file or directory 오류, https://wondev.tistory.com/73
[5] LouisRenWeiWei, bash Tools/environment_install/install-prereqs-ubuntu.sh -y completion error #22691, https://github.com/ArduPilot/ardupilot/issues/22691
[6] Ardupilot, Build ArduPilot, https://github.com/ArduPilot/ardupilot/blob/master/BUILD.md
[7] https://ardupilot.org/dev/docs/copter-sitl-mavproxy-tutorial.html
[8] https://stella47.tistory.com/134
끝.
'SW' 카테고리의 다른 글
| [QT] Could not initialize GLX (0) | 2023.04.08 |
|---|---|
| nvd3d10: cpu cyclestats are disabled on client virtualization (0) | 2023.04.08 |
| Tistory에 사용할 코드 구문 강조 방법 정리하기 (0) | 2022.11.27 |
| ESP-12 를 이용한 센서 연동 방법 조사 (0) | 2022.10.10 |
| [PYTHON] socket 을 이용한 UDP 통신 테스트해보기 (0) | 2022.03.18 |
