
Ubuntu 20.04에서 PX4와 Gazebo 를 ROS2 및 uXRCE-DDS으로 연동하기 위한 개발 환경 세팅과 테스트를 해보자.
목차
0. 초기 컴퓨터 구성
0.1 그래픽 드라이버 설치하기
0.2 Visual Studio Code 설치하기
0.3 Anaconda 설치하기
1. 개발환경 구성하기
1.1 PX4 개발환경 설치하기 (+GAZEBO)
1.2 ROS2 설치하기
1.3 uXRCE-DDS Agent 설치하기
2. PX4 개발환경 최종 테스트 해보기
3. 시행착오들
개발환경을 구성하고나면 아래의 그림을 그리고 개발할 수 있다.
구성품은 다음과 같다.
- FC (비행제어컴퓨터 + PX4 비행제어소프트웨어)
- Simulator (가상의 드론 물리모델)
- MC (미션 컴퓨터, 혹은 시뮬레이션 컴퓨터)
- uXRCE-DDS (데이터 분산 미들웨어)

초기 컴퓨터 구성
그래픽 드라이버 설치하기
1. 설치 가능한 그래픽 드라이버의 버전을 찾아보자.
ubuntu-drivers devices
2. 탑재된 그래픽 카드를 찾아보자.
sudo apt install lshw lshw -numeric -C display
3.드라이버는 다음 방법으로 설치할 수 있는데, (시간이 좀 걸린다!)
- 방법 1 : 추천하는 드라이버를 알아서 설치한다.
sudo ubuntu-drivers autoinstall- 방법 2 : 수동으로 특정 드라이버를 설치한다.
sudo apt install nvidia-driver-535 # 이건 잘 안되더라..
sudo ubuntu-drivers install nvidia:535 #- 설치가 끝나면 반드시 재부팅을 하자.
sudo reboot- 다음 명령어로 설치된 NVIDIA 드라이버를 확인해보자.
dpkg -l | grep -i nvidia- 혹은 NVIDIA 드라이버 설치 후에 GPU 사용 상태 등을 보는 다음 명령어도 볼 수 있다.
nvidia-smi- 설치한 드라이버를 삭제하는 방법은 아래와 같이 해보자.
sudo apt remove --purge nvidia-* sudo apt autoremove
sudo apt-get remove --purge nvidia-* sudo apt-get autoremove sudo apt-get update
Visual Studio Code
1. Download at https://code.visualstudio.com/ and Install dep file
sudo dpkg -i [CODE].deb
Anaconda (Virtual Environment)
Refer from https://docs.anaconda.com/free/anaconda/install/linux/
- Pre-requisites
apt-get install libgl1-mesa-glx libegl1-mesa libxrandr2 libxrandr2 libxss1 libxcursor1 libxcomposite1 libasound2 libxi6 libxtst6- For Ubuntu..
- Find and Download which version you want to install below archive
curl -O https://repo.anaconda.com/archive/Anaconda3-<INSTALLER_VERSION>-Linux-x86_64.sh- https://repo.anaconda.com/archive/
- Install anaconda package
bash ~/Downloads/Anaconda3-<INSTALLER_VERSION>-Linux-x86_64.sh
개발환경 세팅하기
PX4 관련 설치는 다음을 한다.
- PX4 (with GAZEBO)
- ROS2
- uXCRE-DDS
PX4 개발환경 설치하기 (+GAZEBO)
Refer from https://docs.px4.io/main/en/dev_setup/dev_env_linux_ubuntu.html
- PX4 소스코드를 다음 명령어로 내려받는다.
sudo apt-get install git # 없으면 설치하기
git clone https://github.com/PX4/PX4-Autopilot.git --recursive- ubuntu.sh 를 실행해서 Ubuntu 용 설치를 진행한다. (시간이 좀 걸린다!)
bash ./PX4-Autopilot/Tools/setup/ubuntu.sh- 재부팅 혹은 로그아웃했다가 오자.
sudo reboot- Gazebo 설치하기
Ubuntu 20.04에 GAZEBO 를 설치하려면 수동으로 설치해야한다. 아래의 명령어를 입력하는데, 여기서 gz-gazebo를 설치를 진행하면 (설치되어 있다면) Gazebo-classic는 자동적으로 삭제된다.
sudo wget https://packages.osrfoundation.org/gazebo.gpg -O /usr/share/keyrings/pkgs-osrf-archive-keyring.gpg
echo "deb [arch=$(dpkg --print-architecture) signed-by=/usr/share/keyrings/pkgs-osrf-archive-keyring.gpg] http://packages.osrfoundation.org/gazebo/ubuntu-stable $(lsb_release -cs) main" | sudo tee /etc/apt/sources.list.d/gazebo-stable.list > /dev/null
sudo apt-get update
sudo apt-get install gz-garden
Refer from https://docs.px4.io/main/en/sim_gazebo_gz/
- PX4 빌드하기
우선 터미널에서 PX4와 GAZEBO를 같이 빌드해보자.
GAZEBO SITL(Software-In-The-Loop) 명령어는 다음을 따라가보자.
make px4_sitl gz_x500Refer from https://docs.px4.io/main/en/dev_setup/building_px4.html
ROS2 설치하기
다음을 참고했습니다.
Ubuntu 20.04라면, ROS2 Foxy를 설치하자. 아래 과정과 같이 ROS2와 의존성 설치를 진행하자.
- 로케일을 설정한다.
locale  # check for UTF-8

sudo apt update && sudo apt install locales -y
sudo locale-gen en_US en_US.UTF-8
sudo update-locale LC_ALL=en_US.UTF-8 LANG=en_US.UTF-8
export LANG=en_US.UTF-8

locale # verify settings- 소스 설정하기
설치하기 위해 APT 리스트로 ROS2 저장소를 추가하자.
Ubuntu Universe repository를 사용가능하게 설정한다.
sudo apt install software-properties-common
sudo add-apt-repository universe
이제 ROS2 GPG key 를 apt 에 추가한다.
sudo apt update && sudo apt install curl -y
sudo curl -sSL https://raw.githubusercontent.com/ros/rosdistro/master/ros.key -o /usr/share/keyrings/ros-archive-keyring.gpg
APT sources list 에 ROS2 저장소를 추가한다.
echo "deb [arch=$(dpkg --print-architecture) signed-by=/usr/share/keyrings/ros-archive-keyring.gpg] http://packages.ros.org/ros2/ubuntu $(. /etc/os-release && echo $UBUNTU_CODENAME) main" | sudo tee /etc/apt/sources.list.d/ros2.list > /dev/null- ROS2 packages 설치하기.
sudo apt update
sudo apt upgrade
데스크톱 설치 (Recommended): ROS, RViz, demos, tutorials. (This step needs some time!)
sudo apt install ros-foxy-desktop python3-argcomplete
개발 도구들 : Compilers and other tools to build ROS packages
sudo apt install ros-dev-tools- 아래 명령어를 source 하여 개발환경을 설정하자.
# Replace ".bash" with your shell if you're not using bash
# Possible values are: setup.bash, setup.sh, setup.zsh
source /opt/ros/foxy/setup.bash- pip 혹은 apt 으로 Python 의존성 설치하기
pip install --user -U empy==3.3.4 pyros-genmsg setuptools
- 만약 설치한 ROS2 Foxy 삭제한다면..?
sudo apt remove ~nros-foxy-* && sudo apt autoremove
아래와 같이 저장소를 삭제할 수 있다.
sudo rm /etc/apt/sources.list.d/ros2.list
sudo apt update
sudo apt autoremove
# Consider upgrading for packages previously shadowed.
sudo apt upgrade- 설치를 마쳤다면 아래와 같이 예제를 실행해보자.
터미널을 하나 띄워서 설정 파일을 읽어온 후에 C++으로 작성한 talker 을 실행해보자.
source /opt/ros/foxy/setup.bash
ros2 run demo_nodes_cpp talker
다른 터미널을 띄워서 설정 파일을 읽어온 후에 Python 으로 작성한 listener 을 실행해보자.
source /opt/ros/foxy/setup.bash
ros2 run demo_nodes_py listener- ROS2 Workspace 빌드하기
8.1 새 터미널을 열자.
8.2 새 workspace 폴더를 생성하고 들어간다.
mkdir -p ~/ws_sensor_combined/src/
cd ~/ws_sensor_combined/src/
8.3 예제 저장소와 px4_msgs 를 /src 폴더에 복사하자. (main branch가 기본으로 복사되고, 이는 돌리는 PX4 버전에 대응하는 branch이다.):
git clone https://github.com/PX4/px4_msgs.git
git clone https://github.com/PX4/px4_ros_com.git
8.4 ROS 2 개발 환경 파일을 현재 터미널에서 설정하고 colcon으로 현재 작업 공간(workspace)를 컴파일하자. (여기서 시간이 좀 걸린다.!)
cd ..
source /opt/ros/foxy/setup.bash
colcon build- 예제 돌려보기
9.1 작업공간 폴더 최상위로 이동하고, ROS2 환경을 설정하자.
cd ~/ws_sensor_combined/
source /opt/ros/foxy/setup.bash
9.2 local_setup.bash 으로 설정한다.
source install/local_setup.bash9.3 예제를 실행하자. 주의할 점은 아래와 같이 ros2 launch를 실행한다는 점이다.
ros2 launch px4_ros_com sensor_combined_listener.launch.py
위를 실행하면 터미널에 실행한 ROS2 listener 가 실행되면서 메시지를 지속적으로 출력하는 것을 볼 수 있다.
MAVROS
ROS1은 MAVROS 를 설치해야하는데,
ROS2라면 uXRCE-DDS를 설치한다.
uXRCE-DDS에 대한 설명은 공식 문서로 갈음한다.
uXRCE-DDS Agent 설치하기
- 사전 설치
위 장을 하기 전에 PX4 설치를 하고 오자.
PX4 개발환경 설치 중에 GCC G++ 빌드 환경를 설치하기 때문이다.
- Cmake Install
Follow up this post
- Agent를 빌드한다. (빌드에 시간이 꽤 걸린다.!)
git clone https://github.com/eProsima/Micro-XRCE-DDS-Agent.git
cd Micro-XRCE-DDS-Agent
mkdir build
cd build
cmake ..
make
sudo make install
sudo ldconfig /usr/local/lib/- Agent 실행하기.
기본 연결 (UDP : localhost, port 8888)
그래도 PX4를 켜기 전 까지 메시지가 따로 나오진 않는다.
MicroXRCEAgent udp4 -p 8888
시리얼 연결
장치의 파일시스템 주소와 baudrate를 설정하고 사용하자.
sudo MicroXCREAgent serial --dev /dev/ttyUSBX -b 921600- Client 실행하기
PX4 시뮬레이터는 자동적으로 uXRCE-DDS client 를 실행하는데, 로컬 호스트에 UDP 포트 8888에 연결한다.
make px4_sitl gz_x500
PX4 개발환경 최종 테스트해보기
1. 새 터미널을 켜서 GAZEBO 를 이용한 SITL 을 구동한다. 이때 uXCRE-DDS client 가 켜진다.
make px4_sitl gz_x500
2. Start QGroundControl
cd [QGC_PATH]
./QGroundControl.AppImage
3. 다른 새 터미널을 켜서 uXCRE-DDS client 를 켜준다.
MicroXRCEAgent udp4 -p 8888
4. ROS2 예제 중, PX4의 uORB 메시지를 uXCRE-DDS에서 읽어오는 예제를 켠다.
이때 uXCRE-DDS client 를 내부에서 켜긴 한다. 중복해서 켜지진 않는다.
ros2 launch px4_ros_com sensor_combined_listener.launch.py
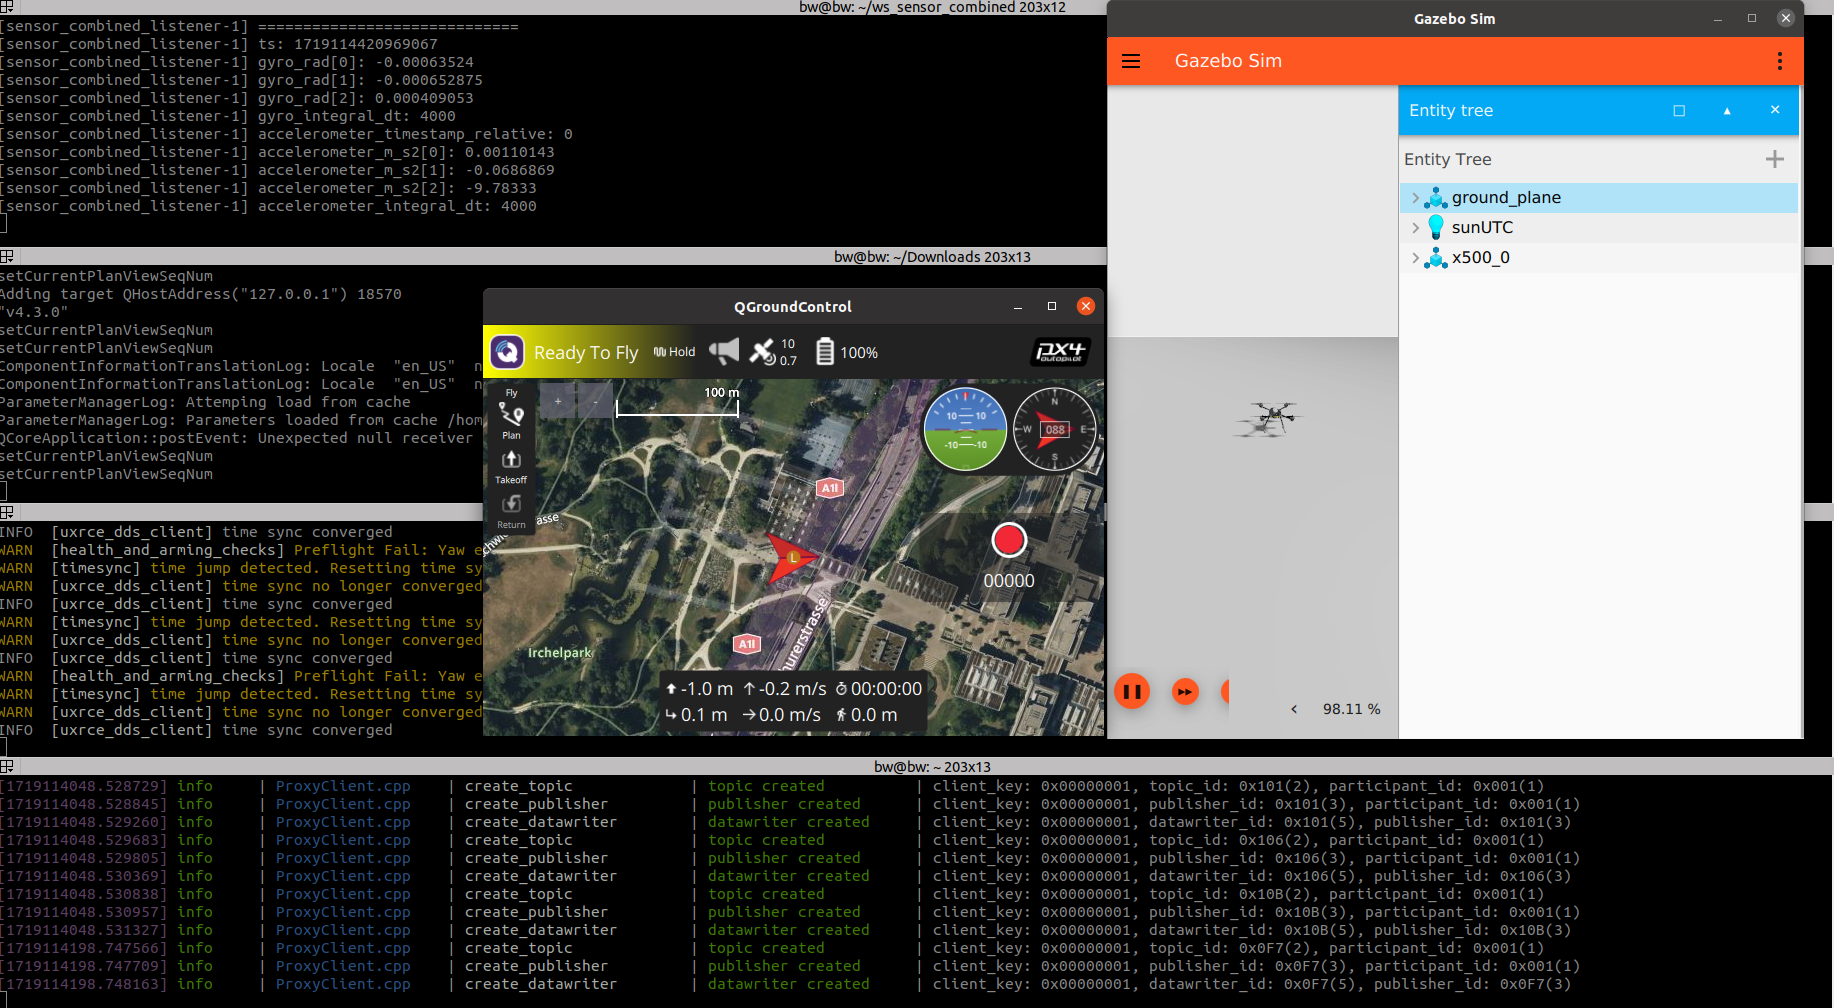
5. Result Image.
From above,
- ROS2 Launch Terminal
- Qgroundcontrol terminal
- PX4-Gazebo Simulation & uXRCE-DDS Client Terminal
- uXRCE-DDS Agent Terminal
Troubleshooting
Terminal Colour disappeared
Copy /etc/skel/.bashrc to ~/.bashrc
https://askubuntu.com/questions/774424/terminal-has-lost-its-colours
*** EOF ***
'SW' 카테고리의 다른 글
| ROS2와 연결한 YOLOv5 돌려보기 (Ubuntu 20.04) (0) | 2024.06.16 |
|---|---|
| Ubuntu 20.04에서 웹캠 되는지 테스트해보기 (0) | 2024.06.16 |
| 다익스트라 알고리즘 (Dijkstra Algorithm) 정리와 구현 (0) | 2024.06.08 |
| 비행체 로그 파일 (*.bin)을 csv으로 변환하는 mavlogdump 수정 함수 (0) | 2024.04.18 |
| 파이썬 스크립트를 실행파일로 만들기 : PyInstaller (0) | 2024.04.18 |