
ROS 는 지원이 종료되어 최신의 구성은 PX4-ROS2 이며
Multi-Vehicle 시뮬레이션을 구현하기 위해서는 Gazebo가 필수적이다.
PX4 툴체인 설치 문서로부터, PX4 ~ Gazebo ~ ROS2 는 Ubuntu 22.04를 추천한다.
그래서 Ubuntu 22.04을 설치하고 ROS2 Humble을 설치하는 문서들을 따라가고,
본 문서에 이를 정리하고자 한다.
Techtree on using PX4 is described below :
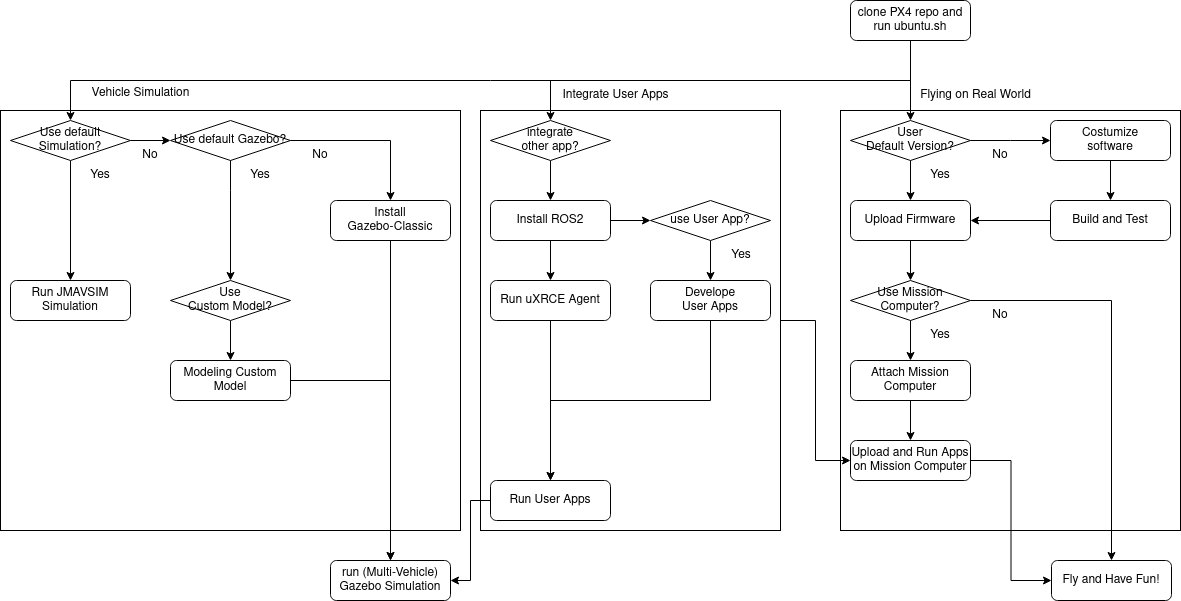
Main topics is identified by "Flying on Real World", "Vehicle Simulation" and "Integrating User Apps"
Basic user may use only "Flying on Real World".
Intermediate user separated as which way user wants to go
- Let PX4 be, and integrate ROS2 to use PX4.
- Modify PX4(Flight control Software)
If a user get used to control a vehicle using PX4, First one is easy. That way is same as developing new program.
Second one needs to get used to PX4 software architexture.
Ubuntu 22.04에서 PX4와 Gazebo 설치하기
Simulation and NuttX(Pixhawk) Targets [3]
1. PX4 소스코드 내려받기
git clone https://github.com/PX4/PX4-Autopilot.git --recursive2. 전체 설치를 위해 기타 입력 인자 없이 ubuntu.sh을 실행한다.
bash ./PX4-Autopilot/Tools/setup/ubuntu.sh
Gazebo 설치하기 [2]
문서에 따르면, Ubuntu 22.04 상에서 개발환경 설정의 일부로 Gazebo (Garden)가 설치된다고 한다.[3]
Gazebo SITL 시뮬레이션은 아래와 같은 make 명령어를 통해서 편리하게 실행할 수 있다.
cd /path/to/PX4-Autopilot
make px4_sitl gz_x500
위 명령어는 PX4 SITL 인스턴스와 Gazebo 클라이언트를 동시에 실행한다. 모든 Gazebo 는 접두사가 gz_ 인 타겟을 만든다.
여기까지이면 QGC(QGroundControl)에서 시뮬레이션 상의 기체를 조종할 수 있다.
시뮬레이션에 ROS 2 연동하기
ROS 2 설치하기 [5]
Ubuntu 22.04에 ROS2 Humble과 이에 대한 의존성 설치를 진행하자.
sudo apt update && sudo apt install locales
sudo locale-gen en_US en_US.UTF-8
sudo update-locale LC_ALL=en_US.UTF-8 LANG=en_US.UTF-8
export LANG=en_US.UTF-8
sudo apt install software-properties-common
sudo add-apt-repository universe
sudo apt update && sudo apt install curl -y
sudo curl -sSL https://raw.githubusercontent.com/ros/rosdistro/master/ros.key -o /usr/share/keyrings/ros-archive-keyring.gpg
echo "deb [arch=$(dpkg --print-architecture) signed-by=/usr/share/keyrings/ros-archive-keyring.gpg] http://packages.ros.org/ros2/ubuntu $(. /etc/os-release && echo $UBUNTU_CODENAME) main" | sudo tee /etc/apt/sources.list.d/ros2.list > /dev/null
sudo apt update && sudo apt upgrade -y
sudo apt install ros-humble-desktop
sudo apt install ros-dev-tools
source /opt/ros/humble/setup.bash && echo "source /opt/ros/humble/setup.bash" >> .bashrc
2. 파이썬 의존성 패키지 또한 반드시 설치해야한다. (pip or apt 으로 설치할 수 있다.)
pip install --user -U empy pyros-genmsg setuptools
Micro XRCE-DDS 에이전트와 클라이언트 설정하기
PX4와 통신하는 ROS2를 위해서, uXRCE-DDS 클라이언트가 PX4 상에서 실행되어야 하며, 컴패니언 컴퓨터 상에서 실행되는 마이크로(u) XRCE-DDS 에이전트에 연결되어야 한다.
에이전트 설정하기
에이전트는 다양한 방법으로 컴패니언 컴퓨터에 설치할 수 있다. 아래에 소스로부터 "독립적으로" 에이전트를 설치하고 PX4 시뮬레이터 상에 실행된 클라이언트에 연결하는 방법에 대해 다룰 것이다.
에이전트 설정과 시작하기
1. 소스로부터 에이전트 fetch 하고 build 하는 다음의 명령어를 입력하자.
git clone https://github.com/eProsima/Micro-XRCE-DDS-Agent.git
cd Micro-XRCE-DDS-Agent
mkdir build
cd build
cmake ..
make
sudo make install
sudo ldconfig /usr/local/lib/
2. 시뮬레이터 상에서 실행되는 uXRCE-DDS 클라이언트를 연결하기 위해 설정과 함께 에이전트를 시작한다.
MicroXRCEAgent udp4 -p 8888이제 에이전트는 실행 중이지만, (다음 단계에서 나오는) PX4를 실행시키기까지는 뭐 많은 것을 보진 못했을 것이다.
참고할 점은 이 터미널에서 구동되는 에이전트를 떠나도 된다. 한 에이전트는 연결 채널 별로 할당된다.
클라이언트 실행하기
PX4 시뮬레이터는 uXRCE-DDS 클라이언트를 자동으로 실행하고, 로컬 호스트의 UDP port 8888에 연결한다.
1. 위에 설치한 PX4-Autopilot 레포지토리의 root에서 새 터미널을 열고, PX4 Gazebo 시뮬레이션을 다음과 같이 시작한다.
make px4_sitl gz_x500
Build ROS2 Workspace
Building the Workspace
To create and build the workspace:
1. Open a new terminal and Create and navigate into a new workspace directory using:
export ROS2_WS=[WHERE YOU WANT]
mkdir -p ~/$ROS2_WS/src/
cd ~/$ROS2_WS/src/
2. Clone the example repo and px4_msgs to the /src dir.
git clone https://github.com/PX4/px4_msgs.git
git clone https://github.com/PX4/px4_ros_com.git
3. Source the ROS2 Dev Env. into the current terminal and compile the workspace using colcon :
cd ..
source /opt/ros/humble/setup.bash
colcon build
Running the Example
To run the executables that you just built, you need to source local_setup.bash. This provides access to the "environment hooks" for the current workspace. In other words, it makes the executables that were just built available in the current terminal.
1. Navigate into the top level of your workspace directory and source the ROS 2 environment
cd ~/$ROS2_WS/
source /opt/ros/humble/setup.bash
2. Source the local_setup.bash
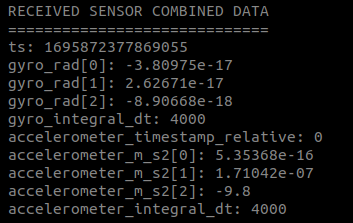
source install/local_setup.bash3. Now launch the example. Note here that we use ros2 launch, which is described below.
ros2 launch px4_ros_com sensor_combined_listener.launch.pyIf this is working you should see data being printed on the terminal/console where you launched the ROS listener:
Controlling a Vehicle
To contorl applications, ROS2 applications:
- Subscribe to (listen to) telemetry topics published by PX4
- publish to topics that cause PX4 to perform some action
The topics that you can use are defined in dds_topics.yaml (opens new window), and you can get more information about their data in the uORB Message Reference. For example, VehicleGlobalPosition can be used to get the vehicle global position, while VehicleCommand can be used to command actions such as takeoff and land.
The ROS 2 Example applications examples below provide concrete examples of how to use these topics.
Multi-Vehicle Simulation with ROS2 and Gazebo Classic
Install Gazebo Classic [6]
The following commands can be used to remove Gazebo Garden and reinstall Gazebo-Classic 11
sudo apt remove gz-garden
sudo apt install aptitude
sudo aptitude install gazebo libgazebo11 libgazebo-dev
Note that aptitude is needed because it can resolve dependency conflicts (by removing certain packages) that apt is unable to handle.
Running the Simulation
The easiest way to do this is to open a terminal in the root directory of the PX4 PX4-Autopilot repository and call make for the desired target. For example, to start a quadrotor simulation (the default):
cd [PX4_ROOT_PATH]
make px4_sitl gazebo-classic
TroubleShooting : Gstreamer is NOT found
Message Log shows like
CMake Error: The following variables are used in this project, but they are set to NOTFOUND.
Please set them or make sure they are set and tested correctly in the CMake files:
GSTREAMER_LIBRARIES (ADVANCED)
you should install gstreamer. but there are many apt packages starting "gstreamer-1.0 ~~~"
Followed this old document[8], you can get what you want.
Multiple Vehicle with Gazebo Classic [7]
1. Make vehicles on Gazebo-Classic
2 of iris can be running. For example :
Tools/simulation/gazebo-classic/sitl_multiple_run.sh -m iris -n 2
Tools/simulation/gazebo-classic/sitl_multiple_run.sh -s "iris:2"
4 of standard_vtol can be running. For example :
Tools/simulation/gazebo-classic/sitl_multiple_run.sh -m standard_vtol -n 4
Tools/simulation/gazebo-classic/sitl_multiple_run.sh -s "standard_vtol:4"
2. Connect with XRCE-DDS in Gazebo Classic
Run MicroXRCEAgent. It will automatically connect to all vehicles:
MicroXRCEAgent udp4 -p 8888If you want to check topics :
ros2 topic list3. Run GCS
Install QQroundControl and Run another terminal.
4. Control Your Vehicles!
Have Fun.
Multiple Vehicles with ROS2 and Gazebo [4] : It doen't work well..
[1] https://docs.px4.io/main/en/dev_setup/dev_env.html
[2] https://docs.px4.io/main/en/sim_gazebo_gz/
[3] https://docs.px4.io/main/en/dev_setup/dev_env_linux_ubuntu.html#simulation-and-nuttx-pixhawk-targets
[4] https://docs.px4.io/main/en/sim_gazebo_gz/multi_vehicle_simulation.html
[5] https://docs.px4.io/main/en/ros/ros2_comm.html#install-ros-2
[6] https://docs.px4.io/main/en/sim_gazebo_classic/
[7] https://docs.px4.io/main/en/sim_gazebo_classic/multi_vehicle_simulation_gazebo.html
[8] https://github.com/Jaeyoung-Lim/sitl_gazebo#gstreamer
EOF
'SW' 카테고리의 다른 글
| Ardupilot 로그 파일 변환하기 (bin, tlog -> csv) (0) | 2024.02.22 |
|---|---|
| 임베디드 코드에서 C++ 사용하는 방법 찾아보기 (0) | 2023.10.09 |
| [PyQt5] 새창 띄워서 matplotlib & blit을 이용한 더 빠른 실시간 그래프 그리기 (0) | 2023.08.08 |
| [PyQt5] 선택한 figure 창에 그래프 그려주는 프로그램 (0) | 2023.08.07 |
| [PYTHON] matplotlib.animation 빠르게 그리기 : blitting (0) | 2023.08.06 |